Deutsch
 Dansk
Dansk Svenska
 Nederlands
 Español
This guide covers
- Google Search Console is a free tool that gives you valuable insights into how Google sees your website and its performance in search results.
- Setting up Google Search Console takes less than 5 minutes – choose domain or URL prefix and verify via HTML tag, Analytics, DNS, or Tag Manager.
- Connect Search Console with Google Analytics to unlock organic keyword data and see actual search queries instead of “(not provided)”.
- Add your XML sitemap to Search Console to help Google find and index your pages faster, especially for new websites.
What is Google Search Console?
Google Search Console is an essential tool for any website owner who wants to improve the visibility and performance of their website in Google search results.
It allows you to get an in-depth understanding of how Google sees and ranks your website, which can help you identify any problems or opportunities for improvement.
In this guide, I will walk you through how you can set up and connect Google Search Console to your website so you can start taking advantage of the many possibilities it offers.
We will also cover some of the tool’s key features and give you tips on how to use them to optimize your website’s visibility and performance in search results. For a complete overview of Search Console capabilities, refer to Google’s official Search Console start guide.
So let’s get started setting up Google Search Console!
How to set up Google Search Console
Is this your first time creating and setting up a Search Console account? I can understand if you find it intimidating or confusing. Fortunately, I have a solution for that.
In this Search Console guide, I will show you step-by-step how to create and easily connect your website with Search Console.
With Google’s own SEO tool, Google Search Console, you get access to a lot of valuable user data, website data, and technical information that you can use to further optimize your SEO.
Let’s jump straight into it.
1. Go to the Google Search Console homepage
The first thing you need to do is go to Search Console and sign in with your Google account. If you don’t have one, first create a Google account here.
Once there, you will be greeted with a welcome screen and presented with 2 options to create a new Search Console property: Domain or URL prefix.
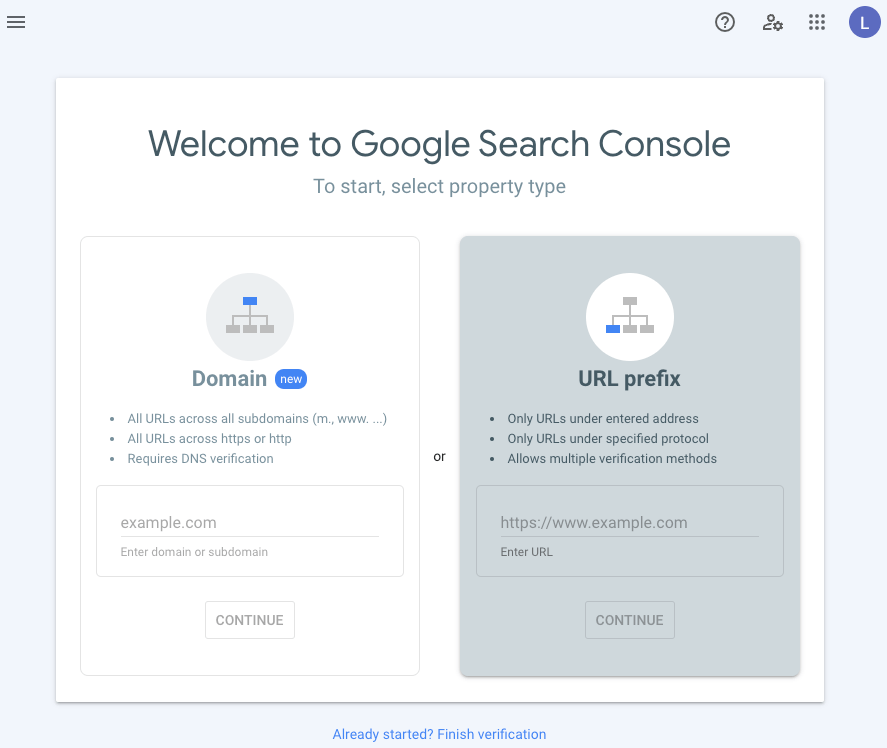
2. Enter your domain or website with protocol
Here you choose the option that suits you best and enter your domain or website protocol (URL prefix).
Do not enter the protocol http(s):// when adding your domain (on the left). Stick to the domain example.com.
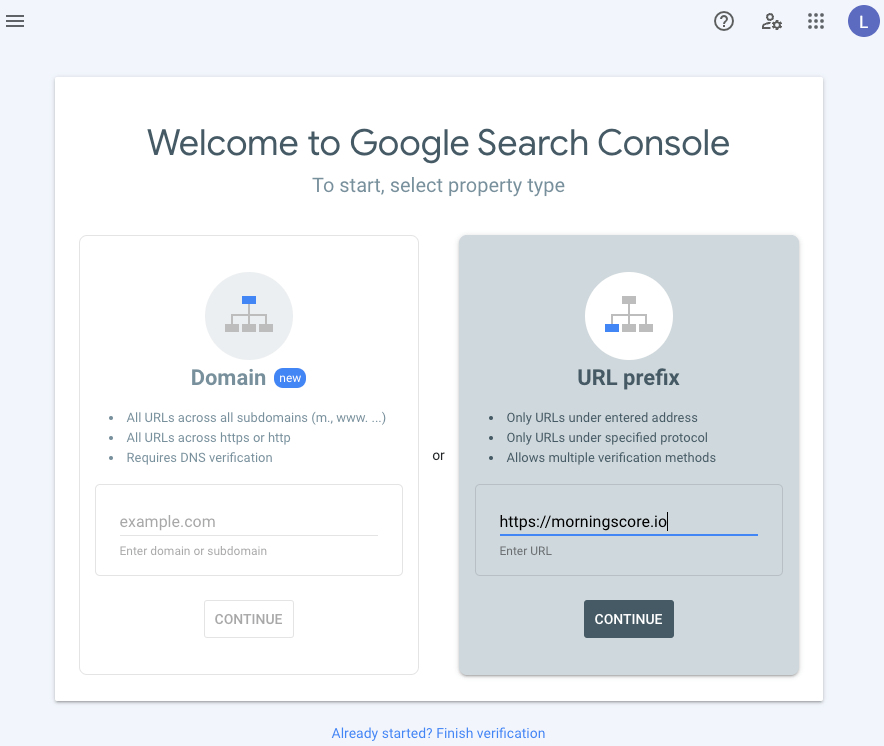
If you only want to see data in Search Console for a specific URL path, such as https://morningscore.io/blog/, you can use the URL prefix and enter that specific web address and protocol.
This option can also be selected if you want to verify by means other than DNS by simply entering your website with its protocol: https://morningscore.io.
In the example for this guide, I have chosen to enter https://morningscore.io under “URL prefix” because it gives me significantly more options to verify my ownership and avoids having to access my DNS (name server) settings.
Now click on “continue”.
3. Verify your ownership in Search Console
Once you have clicked “continue” in step 2, if you have chosen the URL prefix, you will be greeted by the following screen showing the options you can choose to verify your Google Search Console account.
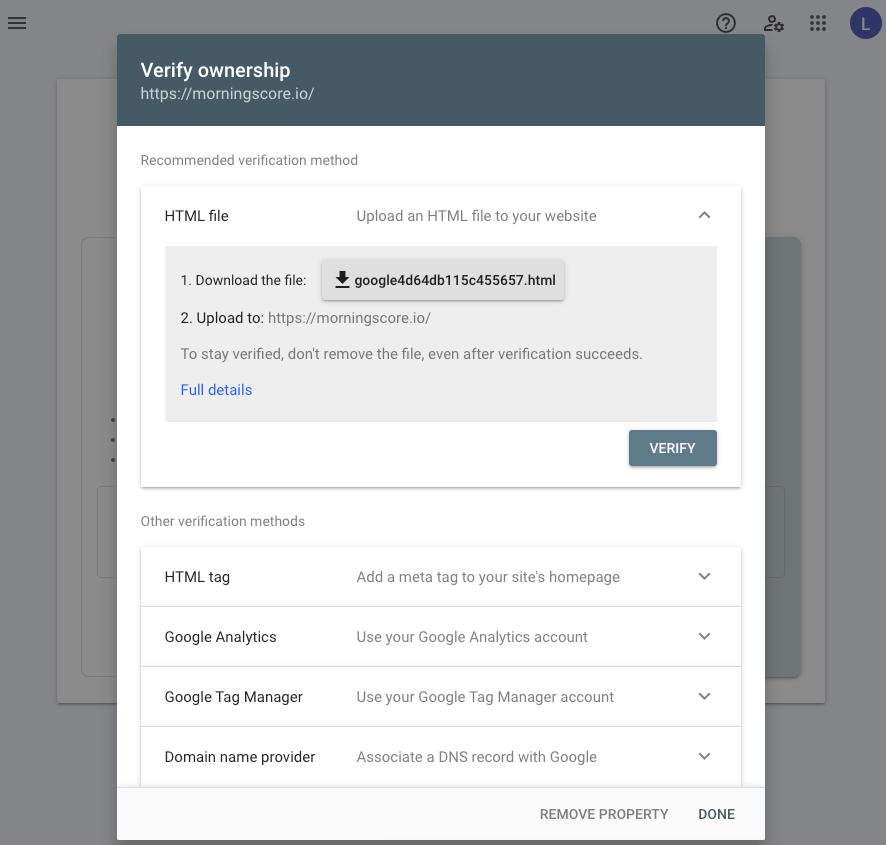
Here you can freely choose one of the possible verification options, but in this guide, I choose to verify via HTML tag. I do this because not everyone knows what DNS is or has access to it, while many have moved away from Google Analytics or do not use Google Tag Manager.
If you have Google Analytics, it is in my opinion by far the easiest solution. Simply log in to your Analytics account, and Google will confirm that you are the rightful owner, allowing you to verify your ownership of the Search Console property.
If you want to stick to this guide and follow it step-by-step but still want to connect to Google Analytics, you can do so. Later in the guide, I show you how to connect Google Search Console with Google Analytics after verification.
Recommended: Choose DNS TXT verification for domain-wide coverage if you have DNS access. For URL-prefix properties, HTML tag or Google Analytics verification are the fastest methods. See all official verification methods and requirements from Google.
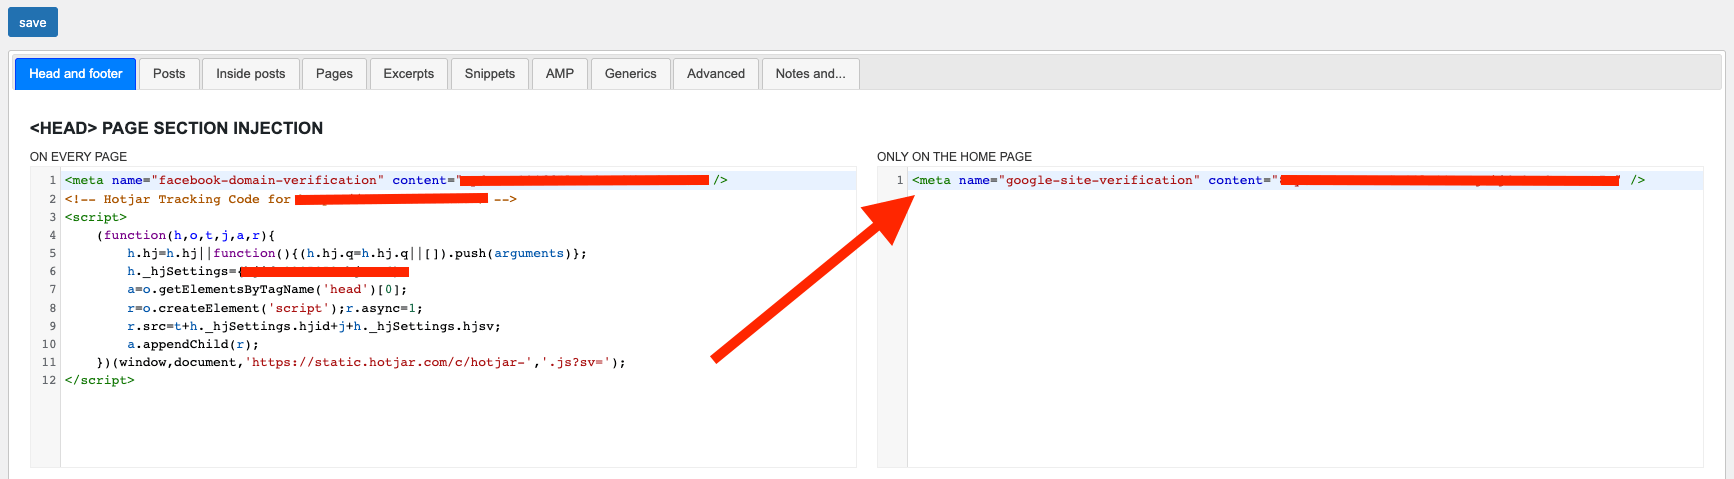
Select “HTML tag” and click “copy” to copy your unique verification code. Paste it into the <head> section, before the opening <body> tag of your website.
If your website is built with WordPress, you can use a plugin to easily add your unique HTML tag to your home page. In this example, I have used the plugin called “Header and Footer“, but you could also use Yoast SEO or similar plugins.
Remember to click “save” before you click “verify” in Search Console. According to John Mueller, Google’s Senior Webmaster Trends Analyst, leaving the verification tag in place permanently prevents accidental loss of access and allows Google to re-verify ownership automatically.
4. Search Console property is now verified
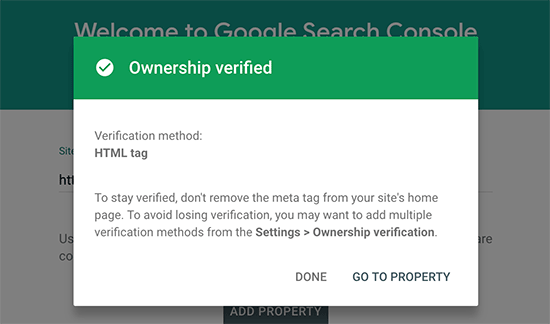
You have now created, connected, and verified your Search Console property!
That was easy, right?
Google will now start collecting valuable data, and you can now get plenty of insights into your website’s performance on Google.
Let’s take a look at finalizing your Search Console setup so you get the most out of it.
Pro tip: As of 2025-2026, Search Console includes new features like Search Console Insights, which surfaces content discovery patterns, and automated Recommendations for indexing and performance improvements. Check these sections regularly for actionable suggestions.
Connect Search Console with Google Analytics
If you did not choose to verify your Search Console setup using your Google Analytics account, it is a good idea to connect the two now.
In Google Analytics, almost all your organic keywords are grouped under the same term: (not provided).
That is not exactly something we can use much in terms of analyzing and drawing conclusions from our data.
Fortunately, we can change that by connecting Search Console and Analytics data – it is super simple:
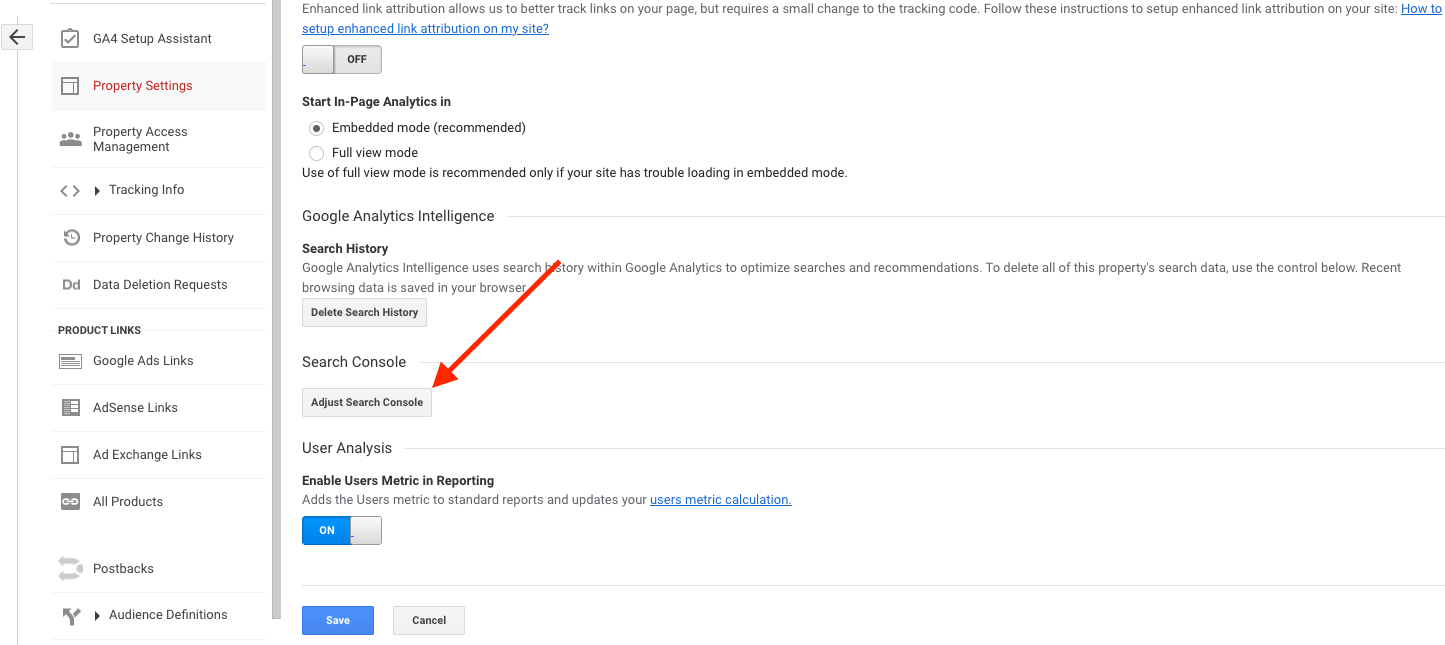
Log in to your Google Analytics 4 (GA4) account and ensure you have admin access to your GA4 property and Owner or Full User access to your Search Console property. Click on Admin in the bottom left corner.
Under the Property column, select Product Links. Click on Search Console, then Link, and choose the relevant Search Console property associated with your site.
Confirm the link by clicking “save”. If you have already linked Search Console with Analytics, you will see an option to manage or adjust your existing connection.
Important: You must have Editor access on the GA4 property and be a verified owner in Search Console to link the properties. Full instructions are available in Google’s official guide for connecting Search Console to Google Analytics.
You have now connected Search Console and Analytics. Within 48 hours, you should be able to see Search Console data in your GA4 Acquisition reports, providing insights into search queries, landing pages, and impressions.
Add a sitemap to Search Console
Adding a sitemap to Google Search Console can help improve the visibility of your website and make it easier for Google to index your pages. Here is a step-by-step guide to adding a sitemap to Google Search Console:
- Log in to your Google Search Console account.
- Select the desired website (property) if you have multiple.
- Click on “Sitemaps” in the left sidebar under “Indexing”.
- Enter the full URL of your sitemap in the field and click “Submit”.
- If there are no errors, your sitemap will be added to Google Search Console.
- It may take a while for Google to index all your pages and update the information in Search Console.
- Keep an eye on your sitemap report to see how many pages have been indexed and if there are any errors or warnings.
Best practice: Sitemaps should use absolute URLs and stay under 50,000 URLs or 50MB uncompressed. For larger sites, use a sitemap index file. Full technical requirements and formats are documented in Google’s official sitemap guide.
To increase the efficiency of Google finding and indexing your sitemap and pages, it is recommended to upload your sitemap to your website root folder and include a reference to it in your robots.txt file.
Don’t forget to update your sitemap whenever changes are made or new pages are added to your website, ensuring that Google always has the most recent information about your site.
To automate the process, it is recommended to use an XML sitemap. This will automatically update every time a page is added or removed from your website.
If you have a WordPress website, you can easily create an XML sitemap using a plugin like Yoast SEO, Rank Math, All-In-One-SEO, or a similar tool. Northeast Medical Group used structured data alongside Search Console sitemap monitoring to capture rich results and AI Overview placements, improving their organic visibility significantly.

Add a user to Google Search Console
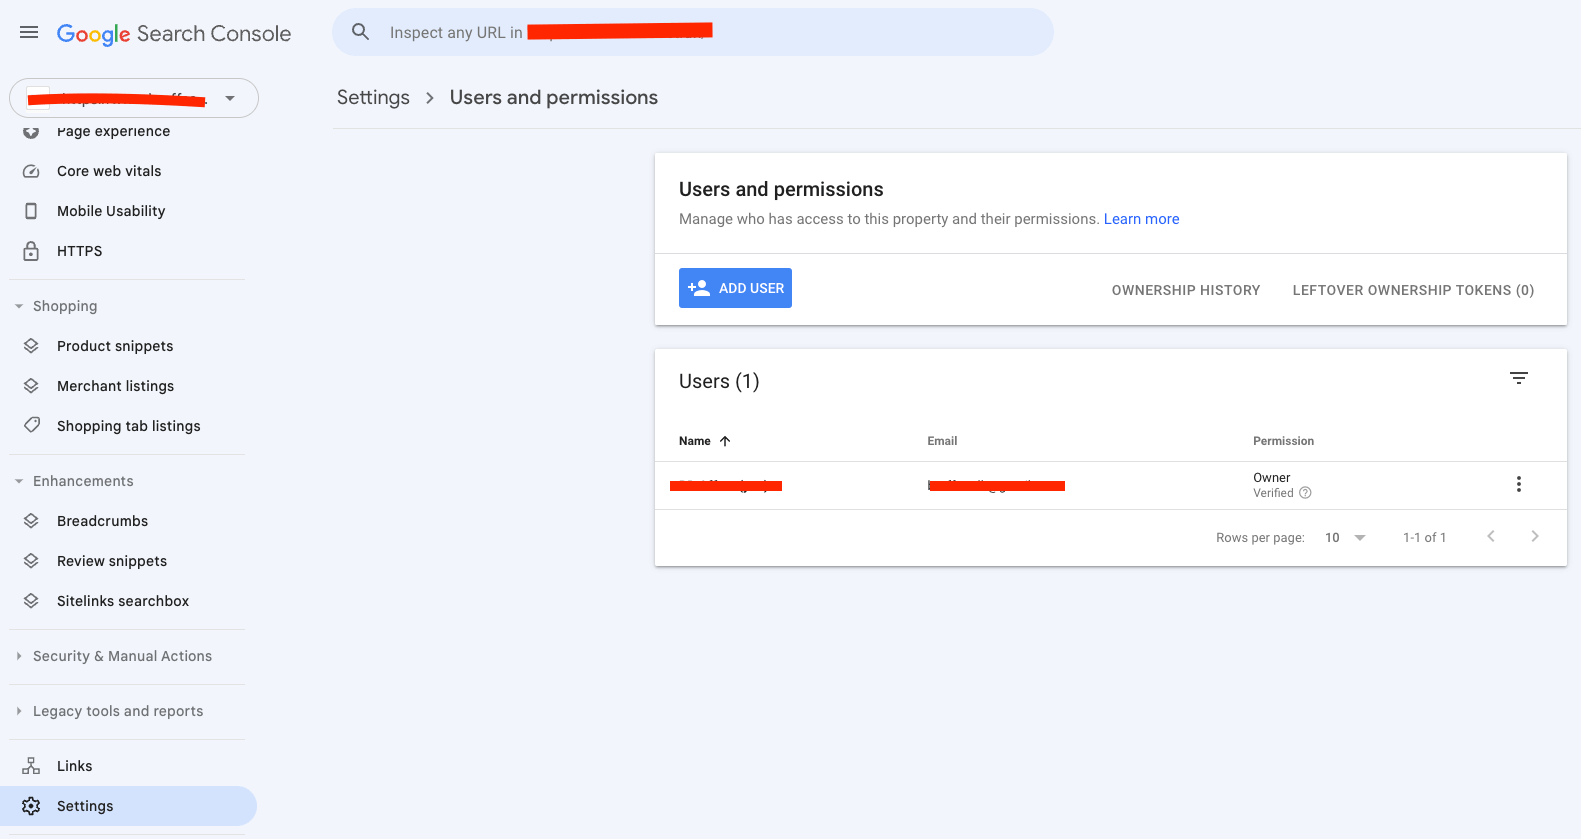
You can manage owners, users, and permissions in Search Console in several ways. A user will have full or limited access to your data.
The permissions are divided into three types:
- Owner: Has full control over the property. They can add and remove other users, configure settings, use all tools, and view all data. There are two types of owners: Confirmed Owner (has confirmed ownership of the Search Console property) and Delegated Owner (has been granted ownership rights by a confirmed owner).
- Full user: Has the right to view all data and perform certain actions.
- Limited user: Has read-only rights to most data.
Once you have confirmed ownership of your domain property, you own the rights. To add an additional user, navigate to:
Search Console –> Settings –> Users and permissions –> Add user
Note: Only owners can add or remove other owners and users. For detailed explanations of each role and permission level, see Google’s official guide on managing owners, users, and permissions.
I hope this guide helped you connect your website to Search Console and get a good start. If you are facing any problems following the guide, feel free to get in touch with me directly on the chat in the bottom right corner.
Last, let’s take a look at some of the frequently asked questions about Google Search Console.
Google Search Console FAQ
What are Webmaster Tools?
Webmaster Tools is the former version of what is now called Google Search Console. In connection with a restructuring of Google’s tool in 2015, Webmaster Tools got a new name in the form of Search Console.
As of 2024, Google has fully transitioned to the branding “Google Search Central” as the unified resource hub for webmasters and SEO professionals. Learn more at Google’s SEO Starter Guide.
Does Morningscore have a Google Search Console integration?
Yes, you can connect your website in Morningscore with your Search Console property and bring Search Console keyword data into the Morningscore dashboard to streamline your data sources and improve your keyword data. To do so, go to Settings -> Search Console in Morningscore.
What are impressions in Search Console?
Google Search Console impressions refer to the number of times a specific URL has appeared in Google search results. Paid results from Google Ads are not counted in the number of impressions.
As of 2026, Search Console also includes a branded query filter that lets you separate branded vs. non-branded impressions for more accurate reporting and analysis.
Can you get indexed faster with Search Console?
Once you have connected your website to Google Search Console, you have the option to submit changes to Google for review when inspecting a specific URL. This can speed up the process of getting new landing pages indexed.
If you have a brand new website, setting up a Search Console property and adding your sitemap will help you get indexed faster. However, Gary Illyes, Google’s Webmaster Trends Analyst, notes that crawl waste from duplicate URLs or parameters can slow indexing, so clean URL structure matters.
Can you control which pages Google Search Console looks at?
Yes, you can. Via robots.txt, you can block Google’s crawlers from accessing certain landing pages. For comprehensive guidance on crawl control and robots.txt configuration, refer to Google’s SEO Starter Guide.
Why can’t I see data for the last 2 days in Search Console?
In Google Search Console, there will usually be a delay of 48 hours from when Google collects the data until it is shown to you in your dashboard. This delay applies to Performance reports, Coverage reports, and most other data views in the tool.
Is Google Search Console data 100% accurate?
If you at this point believe that there is a single tool out there with 100% accurate data, I’m sorry to disappoint you. There is not a single tool – not even Google’s own tools such as Search Console – that can show the complete and full picture with 100% accuracy regarding search volume, clicks, CPC, etc.
What you want to be looking for in any SEO tool is not who is 100% accurate. That doesn’t exist. Realistically, you want to be looking for the tool with the most reliable data.
With this in mind, it’s important to say that you also need to use common sense and not rely solely on any tool’s keyword search volume. Search Console data can also experience delays and temporary fluctuations, especially during algorithm updates, so it’s best to interpret data trends over time rather than relying on snapshot figures.
For advanced analysis and larger-scale projects, consider exporting Search Console data via the API or BigQuery for more granular control. Learn more about advanced workflows in this Google Search Console whitepaper.
Certifications and training
Google does not currently offer an official certification specifically for Google Search Console.
If you want to build verified credentials in Search Console usage, consider completing the Coursera Google Search Console course, which offers a certificate upon completion and covers setup, reporting, and troubleshooting in depth.